Lego Diagonal Connection Points

Lego Diagonal Connection Points (From Origin)

Many fans of Lego are aware of the geometry of the brick, such as the fact that a standard brick has a 5/6 width to height relationship. Much has been written about the height of five stacked plates being the exact width of two bricks. Understanding the geometry of the brick is an essential skill in advanced construction techniques. With that said, there seems to be little attention paid to the need to occasionally connect some creation or another on a diagonal line. This technique is arguably less useful than the aforementioned height / width relationship, but the following information may prove valuable to some.

When attempting to connect a length of brick (such as a wall, etc) in a diagonal orientation, it is useful to know where the studs will line up. Whether or not they’ll line up depends on the length of the hypotenuse (the long edge on a right triangle). If the hypotenuse happens to be the exact distance of any multiple of the width of a brick, the studs line up. The formula for determining the hypotenuse is the trusty old Pythagorean Theorem. Considering we’re always working with right triangles, we simply count the number of studs on the length and width axis. Subtract one from both length and width. Then use the following formula to determine if the particular point has a hypotenuse which lines up.

Formula To Calculate Hypotenuse

For example, the smallest point at which the studs all align for a clean diagonal fit using a standard baseplate grid is a rectangle with the dimensions of 4 x 5. A 6 stud length of brick closes the hypotenuse, as shown below. The calculation can be a bit confusing because the actual measurement to find the hypotenuse is taken from stud center to stud center, rather than the typical measurement from outside edge to outside edge, as seen in the figure to the right.

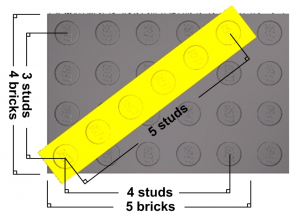
Carrying on the example in the figure, the length is 4 bricks and the width is 5 bricks. Subtract 1 from both to find the stud center to stud center length/width values (3 x 4). Then plug them into the equation above to arrive at:

We end up with a hypotenuse of 5 studs. Again, measured stud center to stud center. With this knowledge in hand, we can set out to calculate the direct line length from the point of origin to any other point on the grid. While the task may be relatively simple, the scope can be a bit daunting. After all, on a standard 48 x 48 stud baseplate that would require running the calculation for 2209 possible points! That is why I’ve come up with this guide to show exactly where those points are on the 48 x 48 baseplate.

Here is a top-down view of a standard 48 x 48 baseplate with each possible connection point shown with a different color 1 x 1 round plate. The lower left corner is the initial point of origin. The plates that are the same color are on the same plane. That is, they’re simply another step using the same calculations as the previous step, but using the last connection point to represent a new point of origin.

Lego Diagonal Connection Points (Top Down View)

The following table shows each of the possible connections (by color) and their dimensions. The first value in each box is the stud center to stud center measurement, while the value in parenthesis (the “Real” value) is the distance in bricks.

Length (Real) Width (Real) Hypotenuse (Real)
3 (4) 4 (5) 5 (6)
5 (6) 12 (13) 13 (14)
7 (8) 24 (25) 25 (26)
8 (9) 15 (16) 16 (17)
9 (10) 40 (41) 41 (42)
12 (13) 35 (36) 36 (37)
20 (21) 21 (22) 28 (29)
28 (29) 45 (46) 53 (54)

LUG Showcase Details

I was trolling and came across this gem our friend Hinkle posted.  I figured that I would repost it here for posterity.

———————————-

The LEGO® User Group Showcase (which will be referred to as the LUG showcase from this point on) will be a small picture frame (W= 20”, D= 15”, and H=23”) inside LEGO® Brand Retail (LBR) stores that will be made available to LEGO® Users Groups (LUGs) as a display space. Each LUG with a relevant LBR store near them will have the opportunity to participate in this program.

The LUG Showcase will be a place where members of a local LUG will be able to utilize the small picture frame in their local LBR store in order to display their creations for the general public. The LUG Showcase will also give the LUG an opportunity to create awareness of their group. Each Showcase will have two removable panels to tell viewers what they’re looking at and who made it.

———————————————————————————-

Rules for Content of the display:

Overall your display should be:

* Child Safe: Displays should exemplify LEGO® Values especially in accordance with keeping material appropriate for young children.
* Adequately fill the display space: The model you create should have the display space in mind and not look too small or too large for the case.

There are a few things the LEGO® Group will ask you to NOT USE as subject matter for your display:

* Competing Licenses
* Old licenses that are now unattainable
* Alcohol based humor or displays
* Sexual based humor or displays
* Drug based humor or displays
* Realistic weapons (life size, built out of bricks)
* Customized elements
* All material is also subject to manager discretion. LUGs should feel free to ask managers ahead of time if they think the subject matter they want to use is questionable.

———————————————————————————-

When installing a window:

Call Ahead – Each club needs to coordinate ahead of time who will be putting in a new display and who will be removing the current display. The club will then need to coordinate with the store manager the best time for them to come in and swap the displays.

Installer must organize their time with LUG Contact/Store Manger before hand to set up time with the manager to install. If there was no previous contact the installer runs the risk of coming at a time when the store is too busy and they will not be allowed to install the window at that time. Each club will be in charge of organizing the order in which they will prepare material for the LUG Showcase and each installer will be responsible for setting up their install/removal with the manager. The LUGs will be provided with the proper store contact information in order to facilitate this.

Switch displays at the same time – The displays are to be done on approximately a 6 week cycle. When an old display is removed the next LUG member should be ready to install the next window at the same time. If the install/removal doesn’t happen at the same time then the next 6 week period will belong to the store to utilize the Showcase for product promotion. The only time this will change is if the manager and the LUG member installing the next item have worked something special out.

Store assistance with setup – When the LUG members come to remove/install the LUG Showcase the store staff will offer assistance if needed but this is dependent on whether or not the store is busy and the staff is needed on the floor working with customers.

How often should a LUG Display? – LUGs choose how often to display but a display can only be in the store for a six week period unless otherwise negotiated with the store manager (ex: if scheduling means you need to wait a week to change out the window then that’s something you need to work out with the manager). When the six week period is up, the LUG must arrange pick up with the store manager and either install a new display or allow the LUG Showcase to be utilized for product displays for the next 6 weeks until the LUG has another display ready.

What if the LUG member never comes to pick their stuff up? – If the LUG member never arranges pick up at the end of the six week, the store will maintain the display for 2 more weeks before they pack the display into a box and arrange with another member of the LUG to pick it up. This should be an extreme contingency though.

Special Note Concerning Those displaying: LEGO® Brand Retail stores are active stores with high traffic throughout the day. The store will do everything they can to keep people from touching the displays in the LUG Showcase, but they cannot be everywhere at once so there is a risk to displaying. You may not want to use any super rare elements in the LUG Showcase.

Also, the store may get busy by surprise when you’ve arranged to install your display. Please be flexible as the store associates and manager may ask you to come back another time if the store is too busy.

———————————————————————————-

Rewards for Displaying:

There are incentives associated with bringing a display to put in the LUG Showcase:

Each person who installs a display will receive on the day of installation:
* 1 Large Pick-a-brick CUP free of charge
* 30% off any 5 unique items at the store. Discount will not stack with other discounts. VIP points are still rewarded on the discounted value of the purchase.
* Certain items may be excluded from discount at the Manager’s discretion. In stock items only (no shop-n-ship).

Important note: The person installing the display only receives this reward when they install the display and not when they remove it, just to clear up any confusion.

Super Important: This must remain consistent across all of the stores.

Group Displays – if the display in the LUG Showcase is legitimately a collaboration between two or three people then they all get the same reward.

Maximum benefiters – During a given install no more than three people can claim the rewards for the display and all three must have legitimately contributed to the displays creation.

———————————————————————————-

What to do if the LUG has no display ready:

If a LUG removes a display and has nothing to replace it with the LUG Showcase will become product displays for the store for the next 6 week period. Any club display can only inhabit the store for 6 weeks at a time. When the club display is removed the store will remove and store the LUG Showcase signage until a new display is installed.

December Gift Exchange

Remember to bring a WRAPPED gift (a LEGO product, $15 or more) to exchange at the meeting in a ‘Dirty Brickster’ fashion. Bear in mind that, anyone saying the words ‘dirty brickster’ will be dealt with swiftly and violently.

Merry Christmas, see you Saturday!

Dark Orange

A testimonial to why Dark Orange is such an awesome color, and yet, why is it seemingly impossible to obtain in large quantities (LUGs are an exception)? Take this as a hint, LEGO. People want this color, and it can do wonders for a model.

It’s far too expensive on Bricklink and Pick a Brick does not even offer it. I understand that it might be a bit more expensive to produce such a color (especially just for adults), but wouldn’t it be more applicable to everyday models (sand/dirt, buildings, roads, terrain, etc.) compared to say, Bright Blue or Bright Yellowish Green? – BrickTownTalk.com

Just Turned 13

The work of art come from a just turned 13 year old girl, Fliker name Littlehaulic’s. Great way to crash into the TFOL scene.
Looks like Dave has some competition.

Love the fireplace

Badges? We Don’t Need No Stinkin’ Badges!

There has been quite a bit of recent debate about who and what a CactusBrick member is.  As we define who and what we are collectively, we need to put forward a common identity.  With tomorrow’s show fast approaching, I figured that there was no better time than the present to get started.

With some feedback from my legal team (Nate), I designed a membership card for 2010-2011.  During the early morning hours, I emailed the graphics to our friend Tom, who graciously donated a bit of cash to print the cards and purchased the needed card holders so they can fit onto a lanyard.

I have eight badges ready and I will bring them to the museum in the morning.  I will give them first to the people who are displaying at the show on a first come, first serve basis.  I look forward to seeing you guys in the morning.